As we all know, Discord is one of the favourite platforms among game lovers and people who are active on social media platforms.
Discord is available for most used Windows, iOS, and Android OS.
It creates a highly sophisticated platform for connecting with like-minded people and provides a positive community environment.
However, An error occurs while installing Discord on windows, and users can no longer install or reinstall the Discord application.
Have you ever tried installing Discord and encountered the following message?
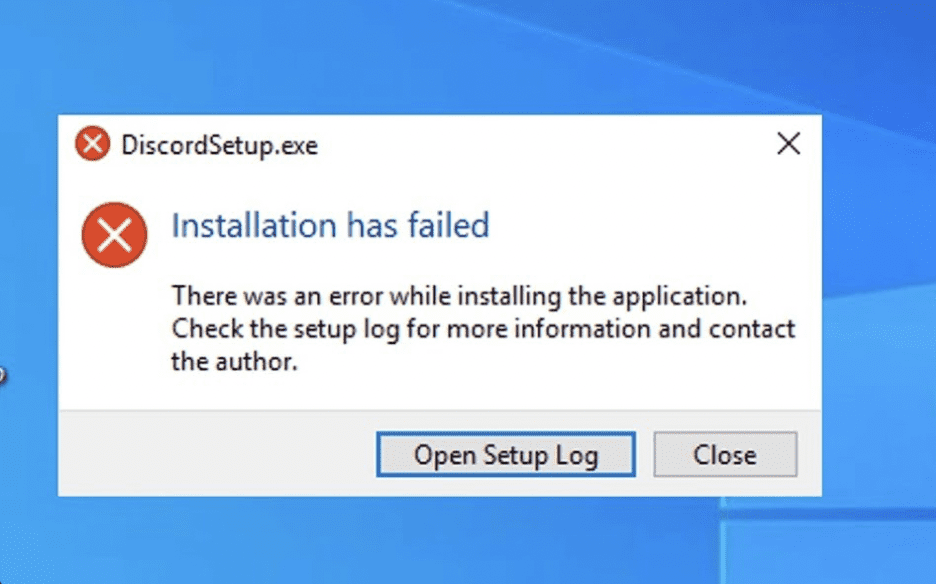
“DiscordSetupe.exe: Discord Installation has failed” following by “There was an error while installing the application. Check the setup log for more information and contact the author. ”
This article will tell you what causes this problem and how you can fix it!
Why Does Discord Installation Have Failed Error Occur?

Discord Installation has failed some services or corrupted files in the system stop you from performing the installation.
There are several reasons why you cannot install Discord on your windows pc. Below are some of the causes
- Check you have recommended system requirements to Install and run Discord
- Files may be corrupted, and some other services in the windows block your discord application from installing.
- Some other services related to Discord might be running in the Background.
The solution below will help you eliminate any difficulties during Discord or Re installation.
Let’s understand the process step by step.
How To Fix “There Was An Error While Installing The Application” On Discord
The fix includes removing the Previously installed files and different methods of installing the file without any further error.
Before troubleshooting, make sure you have a stable internet connection and the required system recommendation to install Discord.
1. Completely Remove The Installed File
Even after Uninstalling your file from the PC, the file shadows, like settings and previous file activity, remain on the PC.
The files might run in the Back end and stopping you from installing Discord.
To remove the Shadow files,
- Open your “Run Command box” by pressing the “Windows+R” button from the keyboard.
- Type “%Appdata%” in the input text box and click “OK.“
- Locate and “Delete Discord File.”
- Again, Open your Run command box and type “%LocalAppData%.”
- Locate and Delete the Discord folder.
- Open your task manager and End all the opened applications.
- Then type “%temp%” in Run command box and Select all in the file path
- Press “Shift+Delete” to delete all the files temporarily.
- Finally, Empty your Trash icon from the desktop
Restart your system, and make sure no other application is open or running during the discord installation. Even close the Discord browser while installing it.
2. Completely Remove The Installed File
Disable any third-party applications temporarily, such as Antivirus software.
This software will block the file if it doesn’t find valid resource details.
You can enable it after the successful installation.
3. Enable Compatibility And Administration Permission On Discord Application
To enable the Compatibility mode, you need to download the extension file.
After the successful download
- Right-click on the “Discord Extension File“
- Go to “Properties” from the menu box
- Click on “the Compatibility section” from the menu
- Mark the check box next to “Run this program in Compatibility mode” under the compatibility tab.
- You can select “Windows 8‘ or your “current version of windows.“
- Mark the check box “Run this program as Administrator” under the compatibility Tab.
- Click on “Apply and OK.“
- Finally, Right, click on the file and run as Administrator.
The next step is to check if any file related to Discord is still running in the background.
4. Force End All The Discord Files
You probably won’t find any files related to Discord since you have entirely removed the discord files from your system.
But Reconfirm it and again check any Discord dependencies
- Press “Ctr+Shift+Escape” from your keyboard to open the task manager
- Go to the “Details tab” and check for any program named Discord
- If you find one, select the file and click on “End task.“
- Likewise, close all the “Discord-related files.“
Now Right, click on the Downloaded extension and Install it. You can successfully install the file without any errors.
If the error persists, the following installation method will help for sure.
5. Manually Extract The Discord Using 7zip
If you still face the error, an issue can occur during the automatic extraction.
In this situation, you can extract the file manually.
First, you must install the 7Zip application if you don’t have one.
You can download the Zip application by clicking the link here.
Download and install the 7zip software.
- Right Click on the Downloaded “Discord Ext “file
- Tap 7zip and Tap on “extract to Discord setup” from the menu
Now the file has been extracted to the new folder.
Copy the file to C disk from your system
- Now open the folder and Right click on “Discord archived file“
- Tab on 7zip and select the option Extract to “Discord-0.0.03-full” ( The version number might vary)
- Open the file and double-click on the “Lib folder“
- Double-click on the Folder “Net45.” You will see only one folder inside Lib; the name may vary.
- Find and locate the “Dicord.exe” file
- Create a Shortcut on the desktop by Right click on the folder and Clicking on “send.”
- Now select on “Create Desktop shortcut option.”
- Now go to Desktop and Double click on the “Discord shortcut icon.“
Hurray! The file has been launched successfully without any errors.
If the issue persists, downloading and installing the Discord file’s alternative version will fix the issue.
You can download the different versions of Discord from their official websites.
Here is the link.
The solution mentioned above will work in all situations and help you to install the Discord extension without any error.
Following the steps correctly, you can successfully install the application at home if you have the correct system requirement in place for Discord to run.


