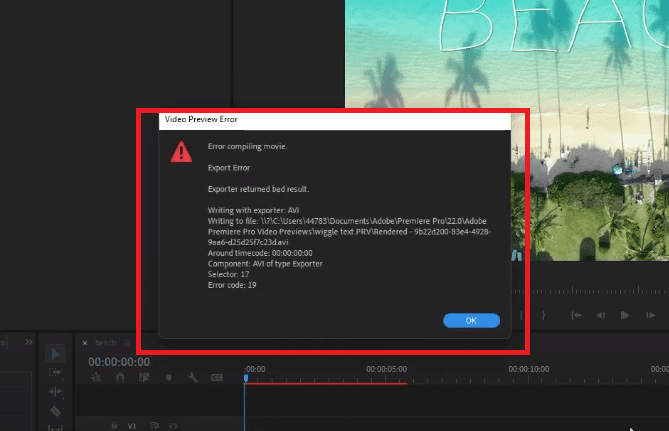
Did you encounter Error Code while using premiere pro?
Premiere Pro is a popular video editing software that is used by professionals and amateurs alike.
However, sometimes users may encounter error code 19 while using Premiere Pro.
This error can be frustrating, as it can prevent you from using the software.
In this article, we will discuss the causes of Premiere Pro error code 19 and provide some fixes to resolve the issue.
What Is Premiere Pro Error Code 19?

The primary cause of Premiere Pro error code 19 is an issue with the computer’s graphics card driver.
This error occurs when the software fails to initialize the OpenGL renderer.
Other possible causes of this error include conflicts with other software running on the computer and corrupted or outdated media cache.
How To Fix Premiere Pro Error Code 19
There are several steps you can take to resolve Premiere Pro error code 19. Here are some of the most effective fixes:
1. Update Your Graphics Card Driver
Updating your graphics card driver is the first step in resolving Premiere Pro error code 19. Visit the website of your graphics card manufacturer and download the latest driver for your graphics card.
Here are the steps to update your graphics card driver in Windows and macOS:
Step For Updating Graphics Card Driver in Windows:
- Identify your graphics card: Go to the Start menu and type “Device Manager” in the search box. Click on the Device Manager app to open it. Expand the Display adapters category to see your graphics card information.
- Visit the graphics card manufacturer’s website: Go to the website of your graphics card manufacturer, such as Nvidia or AMD. Find the support section of the website and look for the latest driver version for your graphics card model.
- Download the driver: Download the driver software that corresponds to your graphics card and operating system. Make sure you download the correct driver version and bit depth (32-bit or 64-bit) that matches your operating system.
- Install the driver: Run the downloaded file and follow the installation instructions to install the new driver. You may need to reboot your computer after the installation is complete.
Steps For Updating Graphics Card Driver in macOS:
- Identify your graphics card: Click on the Apple menu in the upper left corner of your screen and select “About This Mac”. Click on the “System Report” button and select “Graphics/Displays” from the sidebar to see your graphics card information.
- Visit the graphics card manufacturer’s website: Go to the website of your graphics card manufacturer, such as AMD or Nvidia. Find the support section of the website and look for the latest driver version for your graphics card model.
- Download the driver: Download the driver software that corresponds to your graphics card and operating system. Make sure you download the correct driver version that matches your operating system.
- Install the driver: Run the downloaded file and follow the installation instructions to install the new driver. You may need to reboot your computer after the installation is complete.
2. Check For Conflicting Software
Conflicting software running on your computer can cause Premiere Pro error code 19. Check for any software that might be conflicting with Premiere Pro, such as antivirus software or firewall. Disable or uninstall any conflicting software and restart your computer.
3. Clear The Media Cache
Corrupted or outdated media cache can cause Premiere Pro error code 19. Clear the media cache by going to Edit > Preferences > Media Cache > Clean. This will clear the cache and force Premiere Pro to create a new cache file.
4. Switch To I-Frame Only MPEG
Switching to I-frame-only MPEG can potentially resolve some issues related to video quality and editing performance.
However, it is important to note that switching to I-frame only MPEG is not a guaranteed solution.
To switch to I-frame only MPEG, follow these steps:
- Open your video encodings software, such as Adobe Media Encoder or Handbrake.
- Select the video file you want to encode and choose the MPEG format.
- Look for the encoding options or settings and select the I-frame only option. This option may be labeled differently depending on the software you are using.
- Choose the desired video quality and other settings and start the encoding process.
5. Reset Premiere Pro Preferences
Try resetting Premiere Pro preferences to their default settings. Go to Edit > Preferences > General > Reset Preferences on Quit. This will reset all preferences to their default settings, which can resolve any configuration issues causing the error.
6. Update Premiere Pro
Make sure that you are using the latest version of Premiere Pro. Adobe releases updates regularly, which may include bug fixes and improvements that can resolve Error Code 19.
7. Disable Third-Party Plugins
If you have installed third-party plugins, they may conflict with Premiere Pro and cause Error Code 19.
Try disabling these plugins and check if the error is resolved.
To disable third-party plugins, go to the Premiere Pro preferences, select the plugins option, and uncheck the plugins you want to disable.
8. Reinstall Premiere Pro
If none of the above steps work, try uninstalling and reinstalling Premiere Pro. This will ensure that all the software files are properly installed and any corrupted files are replaced.
9. Contact Premiere Pro Customer Support
If you are still experiencing the error after trying these solutions, consider seeking help from Adobe support or a professional technician.
To Contact Premiere Pro Customer Support :

