Xigncode3 Is An Anti-Cheat Program Which Provides a Console For Games To Load.
If Xigncode3 Notices Any Errors Or Suspicious Activities In The Game, It Will Attempt To Prevent The Game From Loading.
It Provides Safety And Security To Gaming Platforms regardless Of Default System Security.
Knight Online Is One Of The Games Played On The Xigncode3 Console.
If You Are a Fan Of Knight Online, Have You Ever Encountered The Programme Terminated Error?
While You Try To Load And Connect With The Game, You Will See The Error Message.
”A Problem Occurred In The Xigncode3 Program.(Error Code = e0190304) Terminating Program!!!”
The Xigncode3 Programme Error Code 2 Is Associated With The Error Code = e0190304.
It Occurs Due To An Interruption While You Try To Load The Game.
Lets See Why The Xigncode3 Terminating Programme Error Occurs.
Why Does A Problem Occurred In The Xigncode3 Program Error Code 2 Occurs?
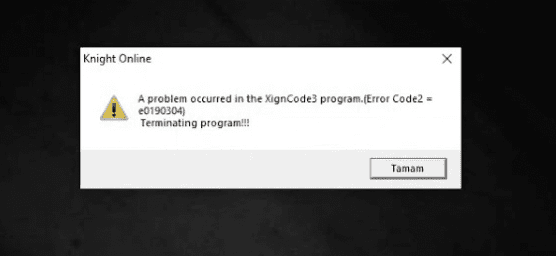
Xigncode3 Terminating Program Error Means You Have Low Bandwidth With An Internet Connection Because Xigncode3 Cant Load.
If Xigncode Is Unable To Find The Correct DNS Server, It Throws The Error ”A Problem Occurred In The Xigncode3 Programme. (Error Code: e0190304) Terminating Programme!!!”
Do Not Change Anything Inside The Game Folder If You Get The Terminating Program Error To a False Positive Result.
Here Is a Handy Guide To Fixing The Xincode3 Terminating Program Error.
How To Fix A Problem Occurred In The Xigncode3 Program Error Code 2
The First Step Is You Need To Check Your Internet Connection.
Check Your Internet Connection: It Would Be Best To Have a Stable Internet Connection To Load The Game.
Before Launching The Game, Reboot Your Wifi Router To Reset Your Connection And Resolve Any Internet-Related Problems.
Changing To a Mobile Internet Connection Will Fix The Xincode3 Termination Error.
1. Changing Alternative DNS
Despite Having a Quality Internet Connection, The Error Still Occurs.
Then You Need To Change Your Pc’s Dns Setting.
Dns Is a Domain Naming Service Which Acts As a Gateway To Your Internet Connection.
Without a Dns Server, The Internet Never Works.
Step1: Right Click On The Tiny Lan Connection Icon At The Bottom Right Of Your System.

Step2 :Tab On Open Network & Internet Security
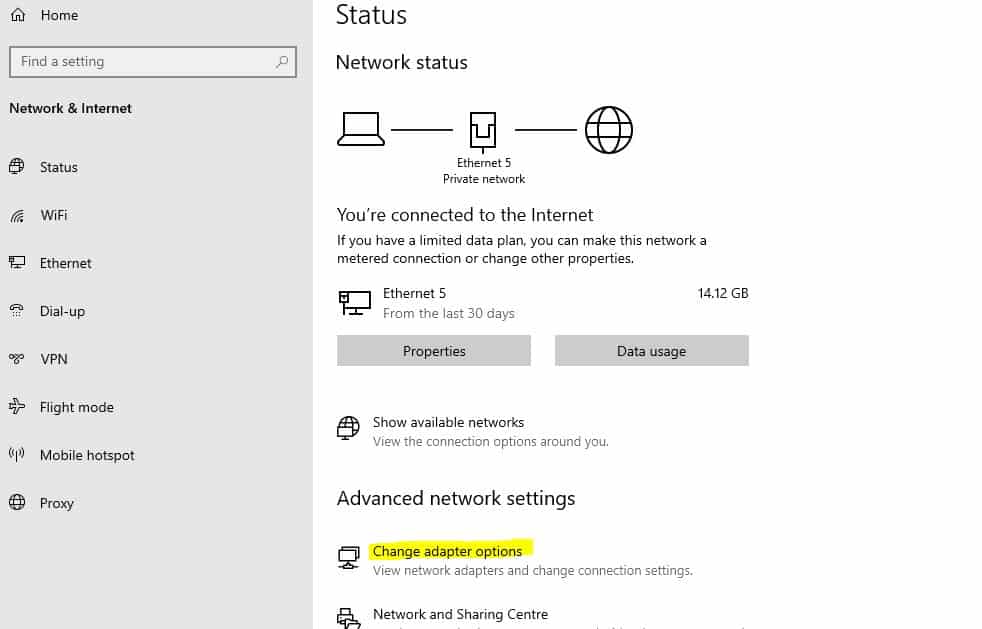
Step 3: Click On Change Adopter Option
The Network Connections Control Panel Will Open, You Will See a List Of Lan, Wifi And Blue Tooth Connections.
Step 4: Right Click On The Current Active Internet Connection Icon

Step 5: Go To Properties
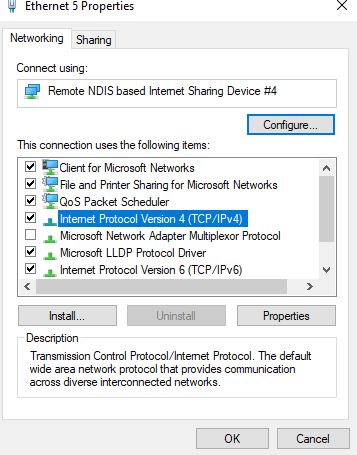
Step 6:Click On Internet Protocol Version 4 (TCP/IP4) Properties
Step 7:Change The DNS Server Address Automatically To Use The Following DNS Server Address.
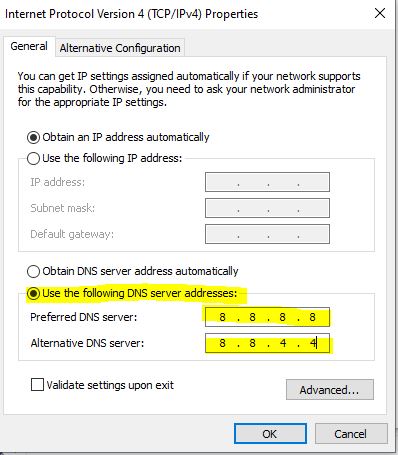
Step 8:Put The Following Google’s Public DNS Server Id
- Preferred Dnsm Server: 8.8.8.8
- Alternative Dns Server: 8.8.4.4
You Can Also Use Third-Party Software Like The Dnsjumper Tool To Change The Dns Server.
After Installing And Running The Tool, You Will See The List Of Active Dns In Green And Non-Working Dns In Red.
Click On Any Green Dns Record, And The Dns Will Automatically Update In Your Network Settings.
The Next Step Is To Check Your Windows Firewall Settings And Makesure They Are On.
2. Check Your Windows Defender Protection Status
Make Sure Your Windows Defender Firewall Setting Is On.
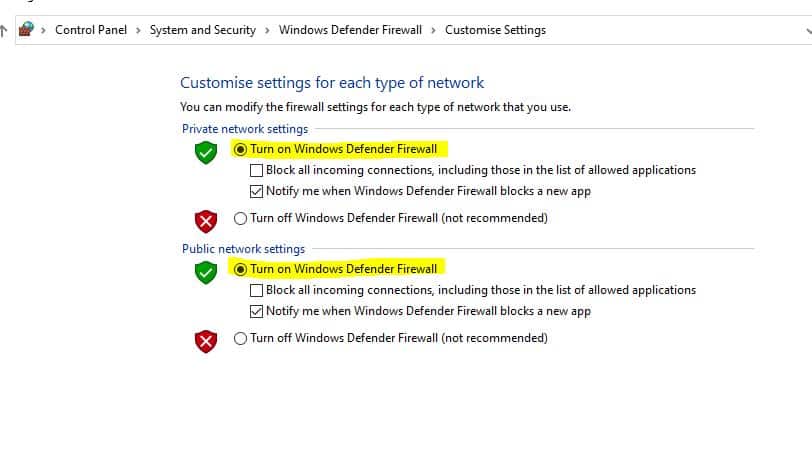
- Type Windows Defender Firewall And Click On It
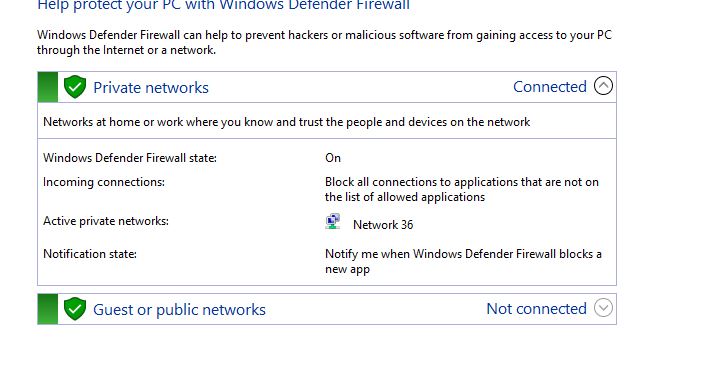
- You Will See a Green Tick Icon On Private Networks And Guest Or Public Networks.
- If Not, You Need To Turn On The Windows Defender Firewall.
- Click On Turn On Windows Defend Firewall On Or Off
- And Enable The Check Box Of Turn On Windows Defender Firewall.
- Now All Set.
3. Make Sure Your Antivirus Program Is Up To Date.
Since The Xigncode Application Focuses On Game Security, It Checks Your Antivirus Settings.
So Make Sure Your Antivirus Is On And Up To Date.
If The Error Persists, Temporarily Disable Your Antivirus, And Try To Load The Game.
After Launching The Game, Turn On Your Antivirus Protection.
Now, You Will See The Error Is Gone, And You Can Easily Log Into Your Game.
If The Problem Continues, There Is Something Wrong With Game File, And You Must Reinstall The Application.
Or You May Reach Out To The Contact Support Team For Further Assistance.
You Can Send An Email To [email protected] To Help. Also, Give Information About Your Antivirus Or Firewall.

