Is Photoshop plagued with the “This unlicensed Photoshop app has been disabled” error and looking for a fix?
Seeing the Unlicensed Error pops up and stops you from accessing Photoshop would be frustrating.
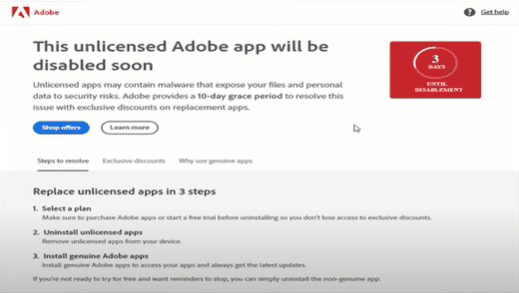
Right after you open Photoshop, the following message pops up, and you cannot access Photoshop anymore.
The error “Adobe: The Unlicensed Adobe app will be Disabled soon.” usually occurs if you are using an Unlicensed app.
Unfortunately, Photoshop has found out and throws the message to buy the Licensed app.
In this article, you will understand How to fix the error and Use the Unlicensed Adobe app without any hustle.
What Causes “This Unlicensed Adobe App Will Be Disabled Soon” Error In Photoshop?

The Unlicensed Adobe app will be Disabled Soon error occurs because the trial period for the Adobe software is ended or the Adobe identified that you are using a pirated version of the Adobe application.
If you use the Unlicensed version of Adobe Photoshop, it is common to get such an error. You need to buy the Licence to use the software further.
If you want to continue with the unlicensed version, the following Troubleshooting will perform better.
How To Fix The “This Unlicensed Adobe App Will Be Disabled Soon” Error In Photoshop?
1. Run The Photoshop Application Without The Internet
Photoshop cannot identify your software information If you don’t have the Internet.
If you are using the pirated version of Photoshop, always follow the below steps.
- Maintain a persistent RAR file, including utilities such as ‘CCstopper,’ ‘patch hosts,’ ‘Adobe Creative Cloud Cleaner,’ and so on.
- Download portable versions of Adobe software you want to utilize, such as ‘Photoshop,’ ‘illustrator,’ and so on, and retain the original rare files unchanged.
- Run virtual computers with no internet connection so the program never finds out.
- We could uninstall ALL Adobe programs, clear folders, and delete temporary files and folders, including standard files, whenever this window appeared.
- Once everything is clear, we can install it as fresh without an internet connection and use it to design whatever you need.
- With these portable Adobe files, we could clean them every time and open them without connection.
Also, follow the next methods after the fresh installations.
2. Edit CCstopper Firewall Setting
CC stopper is a script file that stops all running background Adobe apps.
Run the CCStopper file as administrator and create a firewall block for the following path.
- CCStopper selection (2) for Internet Patch >> (1) for Firewall Block.
- Path of ADS – C:\Program Files (x86)\Common Files\Adobe\Adobe Desktop Common\ADS\Adobe Desktop Service.exe
- Path of Licensing – C:\ProgramFiles\Common Files\Adobe\Adobe Desktop Common\NGL\adobe_licensing_wf.exe
- Path of Licensing helper – C:\ProgramFiles\Common Files\Adobe\Adobe Desktop Common\NGL\adobe_licensing_wf_helper.exe
The path may vary based on your location. Above mentioned locations are the default ones.
3. Edit The Host File
Open CCStopper selection (V2) for Internet Patch > for Host File / DevNull.bat.
Edit the Host file located in:
- For Windows: Navigate to C:\Windows\System32\drivers\etc.
- Right click on Host file >> Select Open with Notepad
- Write the IP Address details below.
- Restart your PC and Launch Adobe to see if the error is gone.
# BLOCK ADOBE #
127.0.0.1 ic.adobe.io
127.0.0.1 52.6.155.20
127.0.0.1 52.10.49.85
127.0.0.1 23.22.30.141
127.0.0.1 34.215.42.13
127.0.0.1 52.84.156.37
127.0.0.1 65.8.207.109
127.0.0.1 3.220.11.113
127.0.0.1 3.221.72.231
127.0.0.1 3.216.32.253
127.0.0.1 3.208.248.199
127.0.0.1 3.219.243.226
127.0.0.1 13.227.103.57
127.0.0.1 34.192.151.90
127.0.0.1 34.237.241.83
127.0.0.1 44.240.189.42
127.0.0.1 52.20.222.155
127.0.0.1 52.208.86.132
127.0.0.1 54.208.86.132
127.0.0.1 63.140.38.120
127.0.0.1 63.140.38.160
127.0.0.1 63.140.38.169
127.0.0.1 63.140.38.219
127.0.0.1 wip.adobe.com
127.0.0.1 adobeereg.com
127.0.0.1 18.228.243.121
127.0.0.1 18.230.164.221
127.0.0.1 54.156.135.114
127.0.0.1 54.221.228.134
127.0.0.1 54.224.241.105
127.0.0.1 100.24.211.130
127.0.0.1 162.247.242.20
127.0.0.1 wip1.adobe.com
127.0.0.1 wip2.adobe.com
127.0.0.1 wip3.adobe.com
127.0.0.1 wip4.adobe.com
127.0.0.1 3dns.adobe.com
127.0.0.1 ereg.adobe.com
127.0.0.1 199.232.114.137
127.0.0.1 bam.nr-data.net
127.0.0.1 practivate.adobe
127.0.0.1 ood.opsource.net
127.0.0.1 crl.verisign.net
127.0.0.1 3dns-1.adobe.com
127.0.0.1 3dns-2.adobe.com
127.0.0.1 3dns-3.adobe.com
127.0.0.1 3dns-4.adobe.com
127.0.0.1 hl2rcv.adobe.com
127.0.0.1 genuine.adobe.com
127.0.0.1 www.adobeereg.com
127.0.0.1 www.wip.adobe.com
127.0.0.1 www.wip1.adobe.com
127.0.0.1 www.wip2.adobe.com
127.0.0.1 www.wip3.adobe.com
127.0.0.1 www.wip4.adobe.com
127.0.0.1 ereg.wip.adobe.com
127.0.0.1 ereg.wip.adobe.com
127.0.0.1 activate.adobe.com
127.0.0.1 adobe-dns.adobe.com
127.0.0.1 ereg.wip1.adobe.com
127.0.0.1 ereg.wip2.adobe.com
127.0.0.1 ereg.wip3.adobe.com
127.0.0.1 ereg.wip4.adobe.com
127.0.0.1 ereg.wip1.adobe.com
127.0.0.1 ereg.wip2.adobe.com
127.0.0.1 ereg.wip3.adobe.com
127.0.0.1 ereg.wip4.adobe.com
127.0.0.1 cc-api-data.adobe.io
127.0.0.1 practivate.adobe.ntp
127.0.0.1 practivate.adobe.ipp
127.0.0.1 practivate.adobe.com
127.0.0.1 adobe-dns-1.adobe.com
127.0.0.1 adobe-dns-2.adobe.com
127.0.0.1 adobe-dns-3.adobe.com
127.0.0.1 adobe-dns-4.adobe.com
127.0.0.1 lm.licenses.adobe.com
127.0.0.1 hlrcv.stage.adobe.com
127.0.0.1 prod.adobegenuine.com
127.0.0.1 practivate.adobe.newoa
127.0.0.1 activate.wip.adobe.com
127.0.0.1 activate-sea.adobe.com
127.0.0.1 uds.licenses.adobe.com
127.0.0.1 k.sni.global.fastly.net
127.0.0.1 activate-sjc0.adobe.com
127.0.0.1 activate.wip1.adobe.com
127.0.0.1 activate.wip2.adobe.com
127.0.0.1 activate.wip3.adobe.com
127.0.0.1 activate.wip4.adobe.com
127.0.0.1 na1r.services.adobe.com
127.0.0.1 lmlicenses.wip4.adobe.com
127.0.0.1 na2m-pr.licenses.adobe.com
127.0.0.1 wwis-dubc1-vip60.adobe.com
127.0.0.1 workflow-ui-prod.licensingstack.com
0.0.0.0 2ftem87osk.adobe.io
For Mac
- Open the Terminal by pressing the command + space bar button.
- Type sudo nano /etc/hosts and hit enter,
- Type your Admin password, and hit enter.
- Copy and paste the IP addresses from the above list at the bottom of the file.
- Press CONTROL + X, Y, and ENTER to return to the Terminal’s main screen.
- Copy and paste the command in the Terminal and hit enter.
sudo killall -HUP mDNSResponder && sudo dscacheutil -flushcache If the error doesn’t fix, follow the next method.
4. Block Photoshop.Exe In The Firewall

Permanently block the Photoshop application in the Firewall, whether you are using licensed or unlicensed Photoshop. Sometimes the warning message appears even if you use the licensed software since Photoshop finds something abnormal.
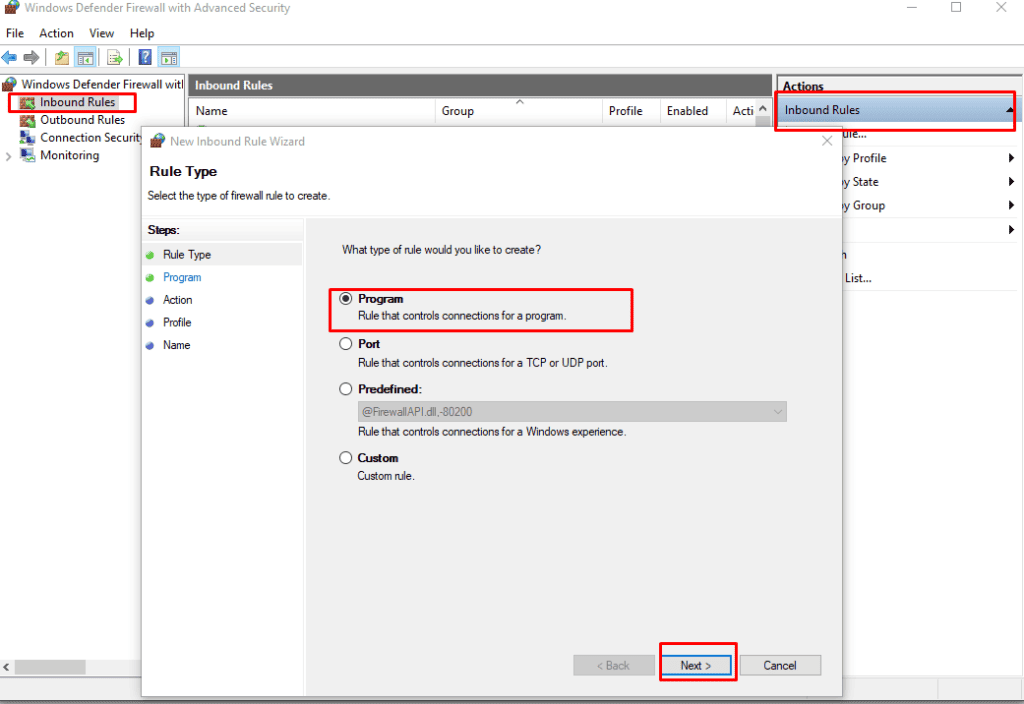
- Navigate to Windows Search bar > >Type Firewall >> Select Windows Defender Firewall with Advance security.
- Select Inbound Rules, select New Rule, and follow these steps:
- Rule type: Program >> Next
- Program Path: Right-click the Adobe Photoshop app >> Open file location >> Copy the URL of the file > Paste the URL into the This program path field >> Next
- Action: Block the connection >> Next.
- Profile Network: Mark all checkboxes: Domain, Private, and Public>> Next.
- Name: Choose any name >> Finish
- Click on the Outbound rule from the left sidebar in the wizard box and follow the same steps mentioned above.
After creating the Outbound rule, restart your pc and see if the message is gone by launching the Adobe Photoshop application.
You will lose internet access going out from the application, but the app won’t be able to check your license.
If the message appears, you must block it from Antivirus software.
5. Block Photoshop.exe File In Antivirus Software
Even after creating the Inbound and Outbound rule, sometimes you see the Adobs’ warning message.
Because, By default, all settings will be managed by antivirus software if you have installed it in the system and the create rule doesn’t work.
You need to block the Photoshop.exe file from the Antivirus software also.
Go to setting in your Antivirus software and block the Photoshop application there.
Now you can see the warning message disappear, and you can work on the application without any interruption.
6. Install The Older Version Of Photoshop (v22)
Usually, the warning message appears often in Photoshop’s latest version.
If You are using the latest version of Photoshop(v23), uninstall and install Photoshop version 22 series to avoid the warning g message.
Now you can successfully disable the “This Unlicensed Adobe App Will Be Disabled Soon” message in Photoshop by following the above simple steps, and you can get your work done.
