Razer Synapse is a software that allows users to customize and manage their Razer peripherals such as headsets, keyboards, and mouse.
However, sometimes users may encounter the issue of Razer Synapse not detecting their devices. This can be frustrating but don’t worry, we have got you covered!
In this article, we will discuss some of the ways to resolve the problem of Razer Synapse not detecting devices like headsets, keyboards, and mouse.
What Causes The Razer Synapse Not Detecting Devices Like Headsets, Keyboards, And Mouse?
Several factors might be at play when you encounter issues with Razer Synapse not detecting your devices. Here’s a rundown of potential causes:
1. Software Conflicts
Other software can interfere with Razer Synapse’s operations. This particularly includes antivirus programs or other peripheral management software running simultaneously.
2. Outdated Drivers
Your Razer device drivers might be outdated. Razer Synapse uses the latest drivers to recognize and manage your devices effectively.
3. Connection Issues
The connection between your Razer device and computer might be compromised. This could be due to faulty USB ports or the cables themselves.
4. Corrupted Installation
The Razer Synapse software on your computer could be corrupted or improperly installed, hindering its ability to detect connected devices.
How To Fix Razer Synapse Not Detecting Devices Like Headsets, Keyboards, And Mouse?
To fix the Razer Synapse not detecting devices like headsets, keyboards, and mouse errors, perform hardware troubleshooting, clear temporary files, and disable Riot Vanguard. Additionally, repair the razer synapse to fix this issue.
1. Perform Hardware Troubleshooting
Sometimes, the problem might be with the hardware connections. Performing hardware troubleshooting is a systematic process to identify and resolve issues related to physical connections and the hardware itself.
Here’s a detailed breakdown of the steps you should take when Razer Synapse is not detecting your devices like headsets, keyboards, and mouse:
Check The Physical Connections
Ensure that your Razer devices are plugged in securely. Loose connections can cause the devices not to be detected.
If you’re using a USB hub, try connecting the devices directly to the computer’s USB ports to rule out any issues with the hub.
Inspect The USB Ports
- Try plugging the device into a different USB port to determine if the issue is with a specific port.
- Check the USB ports for any physical damage or debris that could be causing a poor connection.
Examine The Cables And Devices
- Carefully inspect the cables for any signs of wear, fraying, or damage. Damaged cables could be the reason for connectivity issues.
- Look over the device’s USB connector for any dirt, damage, or bent pins that might interfere with a good connection.
2. Clear Temporary Files
Connecting your Razer devices to a different computer that has Razer Synapse installed is a diagnostic step that can help you determine where the issue lies.
- Use the Run command box with
Windows key + R. - Type
%temp%and delete all temporary files.
3. Try Different Devices
Sometimes, the problem may be device-specific. If you have access to other peripherals, try connecting them to see if they are recognized by Razer Synapse.
This can help isolate whether the issue is with the specific device or a broader problem with Synapse or your computer.
4. Repair Razer Snypase
This procedure should resolve any glitches or issues with Razer Synapse, allowing you to reconnect your device successfully.
To repair Razer Synapse on your Windows PC, follow these steps:
- Open the Settings app.
- Click on “Apps” in the side panel.
- Select the “Apps & features” tab.
- Find Razer Synapse in the list of installed programs.
- Click on the three-dot menu beside it and select “Modify.”
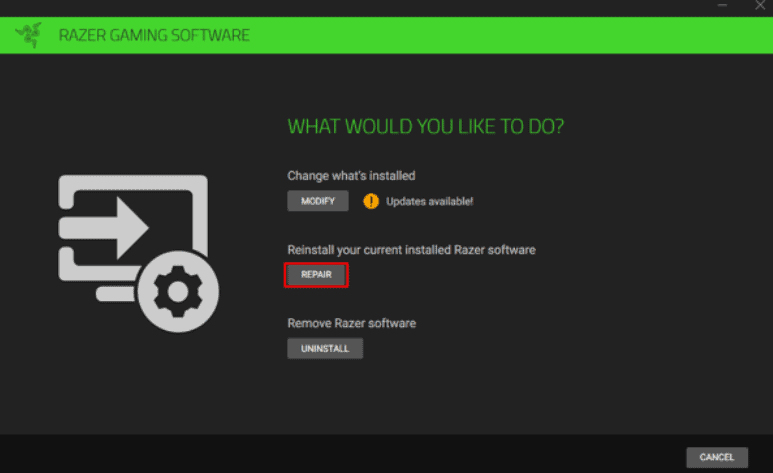
- This opens the Razer Gaming Software window with “Modify,” “Repair,” and “Uninstall” options.
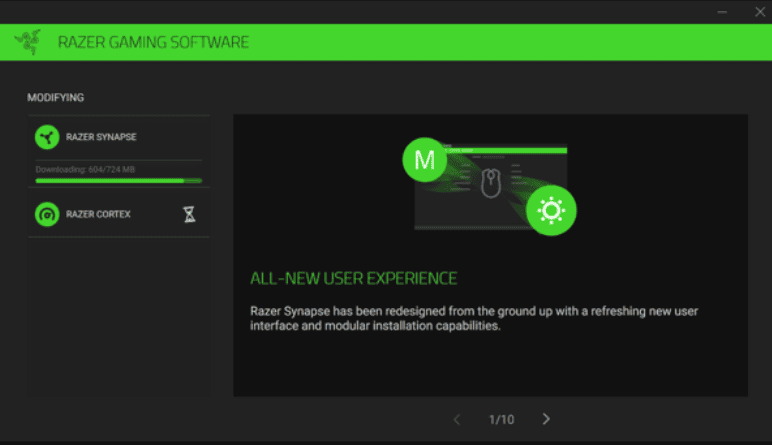
- Click on “Repair.” It will automatically run the process and fix the issues.
- After the Repair process is done, restart your PC.
5. Uninstall And Reinstall Device Drivers
Corrupted or outdated drivers can cause Razer Synapse not to detect your devices. Uninstalling the drivers from the Device Manager and reinstalling them can resolve the issue.
To do this, you would need to:
- Open Device Manager.
- Expand the category for your Razer device.
- Right-click on the device and select “Uninstall device.”
- Disconnect your Razer device.
- Restart your computer.
- Reconnect your device and allow Windows to reinstall the driver automatically.
6. Disable Antivirus Software
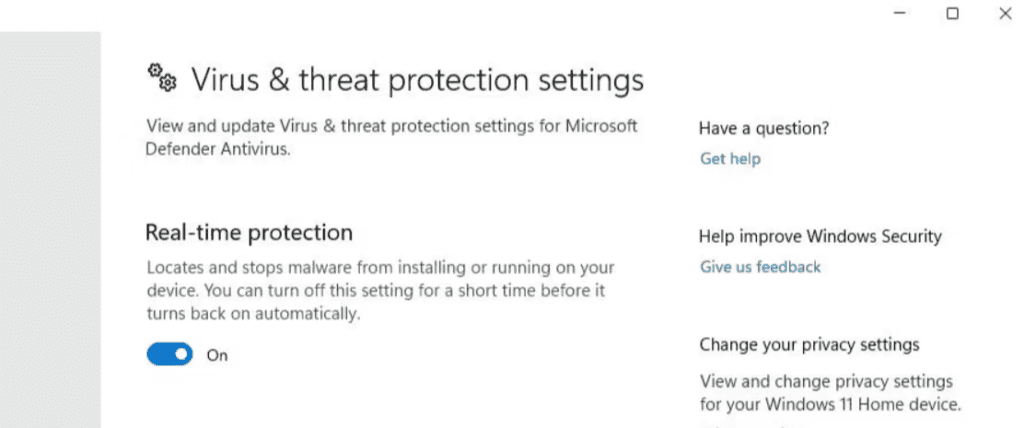
Sometimes, the antivirus software can also conflict with Razer. Temporarily disable your antivirus software and check if Synapse detects your device.
Steps to Turn off the Antivirus:
- Open your antivirus program.
- Find the option to turn it off temporarily and select it.
- Check if Razer Synapse detects your devices now.
- Remember to turn your antivirus back on afterwards.
7. Disable Riot Vanguard
An outdated version of Riot Vanguard can block Razer drivers. Ensure it’s up-to-date or temporarily disable it.
- Right-click on the Riot Vanguard icon in the system tray.
- Select the option to disable or exit Vanguard. This might require a system restart.
- After disabling Vanguard, open Razer Synapse to see if your devices are detected.
- If you need to use Vanguard again, simply restart your computer, and it should automatically re-enable itself, or follow the instructions provided by the software to re-enable it manually.
8. Uninstall And Reinstall Razer Synapse
A clean reinstall of Razer Synapse can help resolve any conflicts or corrupted files within the software itself.
Here’s how to do it:
- Uninstall Razer Synapse from your computer.
- Delete any leftover files in the C:\Program Files (x86)\Razer and C:\ProgramData\Razer directories.
- Download the latest version of Razer Synapse from the Razer website.
- Install the software and reconnect your devices.
9. Contact Razer Support

When your Razer Synapse software fails to detect devices like a headset, keyboard, or mouse, contacting Razer Support is a recommended step.
To ensure a smooth support experience, follow these guidelines:
- First, visit the Razer Support website. It’s structured to guide you through self-service options or direct you to more specialized assistance.
- If troubleshooting methods have not resolved the issue, look for the Contact Support section on the webpage.
To reach out via email:
Complete the email form with details about your problem. Provide your device model and a description of what you’ve already attempted.
Live chat provides immediate assistance:
Engage with Razer’s live chat feature during working hours for real-time help.

