Are you facing the frustrating situation of having your Facebook ad account disabled due to unusual activity?
It can be a concerning and bewildering experience, especially when you rely on Facebook advertising to reach your audience and promote your business.
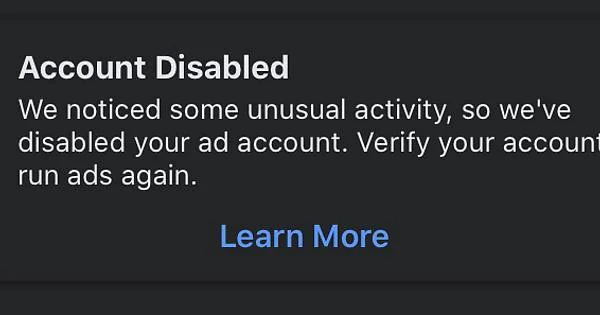
The message ” Account Disabled, We noticed some unusual activity so we’ve disabled your ad account. Verify your account run ads again” can leave you seeking clarity and a path to resolution.
In this blog, we will provide comprehensive guidance on addressing this issue, offering step-by-step instructions to help you navigate the process of reactivating your ad account.

How To Fix Facebook Ad Account Disabled We Noticed Some Unusual Activity So We’ve Disabled Your Ad Account.
To resolve a disabled Facebook ad account due to unusual activity, you can review the reason for disabling, appeal the decision, and address unusual activity. Moreover, you may also review Ad Content and Compliance and address billing or payment issues.
1. Review The Reason For Disabling
1. Review The Reason For Disabling
First, it’s essential to understand the specific reason for the account being disabled. This can be found in the notification or email sent by Facebook. Understanding the reason will help in addressing the issue effectively.
Log in to your Facebook account and navigate to the Ads Manager. Look for any notifications or alerts related to your ad account.
However if have you received an email notifying you about the disabling of your ad account, carefully review the content of the email.
2. Appeal The Decision
Facebook provides an option to appeal the disabling of an ad account. You can do this by visiting the Ads Manager and locating the option to appeal the decision.
To appeal the decision to disable your Facebook ad account, you can follow these steps:
- Log in to your Facebook account and navigate to the Ads Manager.
- In the Ads Manager, locate the disabled ad account. Facebook typically provides a notification or alert within the Ads Manager when an ad account has been disabled.
- Look for an option to appeal the decision. This is often available within the notification or alert regarding the disabled ad account. Click on the appeal option to begin the process.
- When prompted, provide a clear and concise explanation of the situation. It’s important to be transparent and provide relevant details to support your appeal.
- If applicable, you may have the option to submit supporting documentation as part of your appeal.
- After submitting the appeal, monitor your email and the Ads Manager for any communication from Facebook.
3. Address Unusual Activity
If the unusual activity was due to unauthorized access or other security concerns, take immediate steps to secure the account.
This may involve changing passwords, enabling two-factor authentication, and reviewing connected devices.
Change Your Password:
- Access your Facebook account using your current login credentials.
- Click on the downward-facing arrow in the top right corner of the Facebook page. From the dropdown menu, select “Settings & Privacy” and then click on “Settings.“
- In the left-hand column, click on “Security and Login” to access the security settings for your account.
- Under the “Login” section, locate the “Change password” option. You may be prompted to enter your current password for verification.
- Once you have entered and confirmed your new password, save the changes to update your Facebook ad account password.
Enable Two-Factor Authentication:
- Log in to your Facebook account and click on the downward-facing arrow in the top right corner of the page.
- From the dropdown menu, select “Settings & Privacy” and then click on “Settings.” In the left-hand column, choose “Security and Login.”
- Under the “Security and Login” section, locate the “Use two-factor authentication” option. Click on “Edit” to begin the setup process.
- You may need to verify your identity or enter a confirmation code to complete the setup process.
- Once the two-factor authentication is set up, save your changes to enable this additional layer of security for your Facebook ad account.
Review Connected Devices:
- Log in to your Facebook account and click on the downward-facing arrow in the top right corner of the page.
- From the dropdown menu, select “Settings & Privacy” and then click on “Settings.” In the left-hand column, choose “Security and Login.”
- Under the “Security and Login” section, locate the “Where You’ve Logged In” option. This will display a list of all the devices currently logged in or recently used to access your Facebook account.
- Scroll through the list to review the devices and locations where your account is currently active.
- If you identify any unrecognized devices or locations, you can select the “Log Out” option next to the respective device or location to remove access and log out of the account from that device.
4. Contact Facebook Support

If the appeal process does not yield a positive result, reaching out to Facebook support can provide further assistance.
Facebook has a support system in place to address ad account issues, and they may be able to provide additional guidance or insight into the disabling of the account.
5. Review Ad Content And Compliance
It’s important to review the content of any ads that were running at the time the account was disabled.
Ensure that the ad content complies with Facebook’s advertising policies, including any recent updates to those policies.
To review ad content and ensure compliance with Facebook’s advertising policies for your ad account, follow these steps:
Log in to your facebook.com and navigate to the Ads Manager.
In the Ads Manager, review all active ads to ensure they comply with Facebook’s advertising policies. Pay attention to the ad copy, images, and any linked landing pages.
6. Address Billing Or Payment Issues
If the disabling was related to billing or payment issues, ensure that any outstanding balances are settled and that the payment method associated with the ad account is valid and up to date.
To address billing or payment issues related to your Facebook ad account, follow these steps:
- Check Payment Method: Ensure that the payment method associated with your ad account is valid and up to date. For this, you can click here for detailed guidance on selecting a valid payment method.
- Review Billing History: In the Ads Manager, navigate to the billing section to review your billing history. Check for any outstanding balances, failed payments, or other billing issues that may have impacted your ad account.
