Is your Cricut print-then-cut function not working properly? Cricut is a smart cutting machine that can cut all types of patterns, designs, and motifs on any fabric or material. It is the perfect machine for people who love DIY crafts.
The Cricut print-then-cut function allows you to create your design on the Cricut Design Space app, print it on your printer, and then load it on the Cricut machine to cut it along the edges.
If your Cricut print-then-cut function is not working with accurate precision and you are getting undesirable cuts on your design, do not worry as this is a very common issue that can be fixed.
This article will guide you to understand why your Cricut print-then-cut function may not be working and what you can do to fix the issue.
Why Is Cricut Print Then Cut Not Printing Correctly?

If the print-then-cut function is not working on your Cricut machine, it could be due to selecting the wrong paper size setting, the sensor light not working, bugs in the Cricut Design Space app, or firmware not being updated.
1. Wrong Paper Size Option
If you have opted for different paper settings in your printer and are using paper with different dimensions to print on the Cricut machine, it could cause issues with accurate calibration.
2. Sensor Light Not Working
The sensor light of the Cricut machine works accurately when there is no direct light coming towards it.
If you are using the Cricut machine in a well-lit room with light entering the sensor light space, the print-then-cut function will not work on the Cricut machine.
3. Glitches On The Design Space App
The Design Space app helps you to create your designs, patterns, and motifs and connect them to the Cricut machine to print them.
If there are glitches or bugs in the Design Space app, it may interfere with the process of calibration on the Cricut Design Space app and the print-then-cut function will not work.
4. Cricut Firmware Not Updated
The firmware needs to be up to date and updated regularly to function properly. If you have not downloaded the firmware updates, it may cause issues with the Cricut print-then-cut function not working properly.
How To Fix Cricut Print Then Cut Not Printing Correctly?
If the print-then-cut function is not working on your Cricut machine, check the paper size on your print settings, check the sensor light, uninstall and reinstall the Design Space app, and force a firmware update.
These fixes should solve your issue of calibration not working on your Cricut machine.
1. Check Paper Size
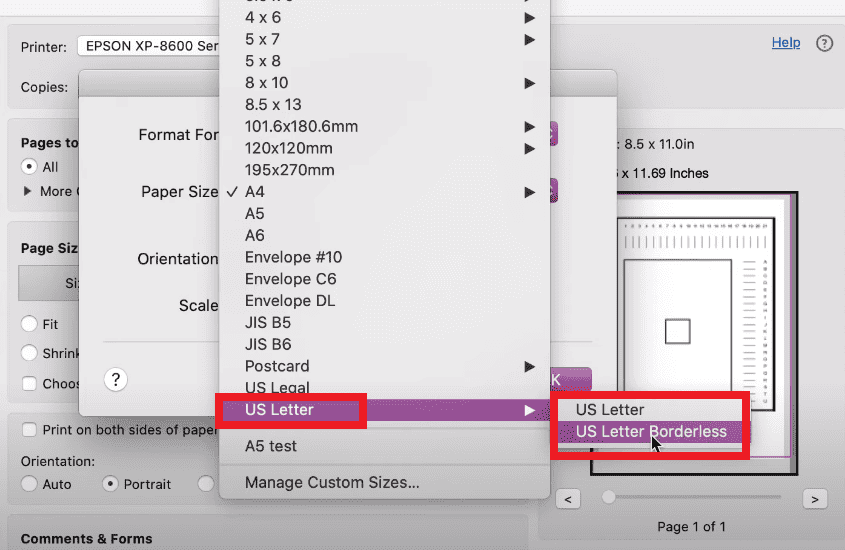
Check the paper size option while printing your design on your device. Ensure that the paper size on your print settings is the same as the size of the paper you are using to print.
A4 size and US Letter size are of slightly different dimensions. The dimensions for an A4 paper are 8.3 x 11.7 inches whereas the dimensions for US Letter paper are 8.5 × 11 inches.
Make sure that you opt for the US Letter paper size on your print settings if you are using US Letter paper.

2. Check Sensor Light
The sensor light of the Cricut machine works best when there is no direct light flashed toward it. Ensure that you are using the Cricut machine in a dimly lit room with no direct light facing toward the sensor light of the machine.
Close the lid of the Cricut machine to ensure no light enters the sensor light space of the machine while calibrating.
3. Uninstall And Reinstall The Cricut Design Space App
It could be a possibility that the Cricut Design Space app may have some bugs or technical glitches causing it to interrupt the calibration process. Try to uninstall and then reinstall the Cricut Design Space app on your device to fix the issue.
Follow these steps to uninstall and then reinstall the Cricut Design Space app:
- Go to the Settings on your Windows or Mac device.
- Click on Apps.
- Click on Installed apps. You can now see the list of all apps installed on your device.
- Search for the Cricut Design Space app from the search bar on top.
- Click on the three-dotted button on the right side and then click on Uninstall.
- Go to Cricut Design Space and then download the Cricut Design Space app suitable for your device to reinstall the app.
4. Force Firmware Update On Cricut Machine
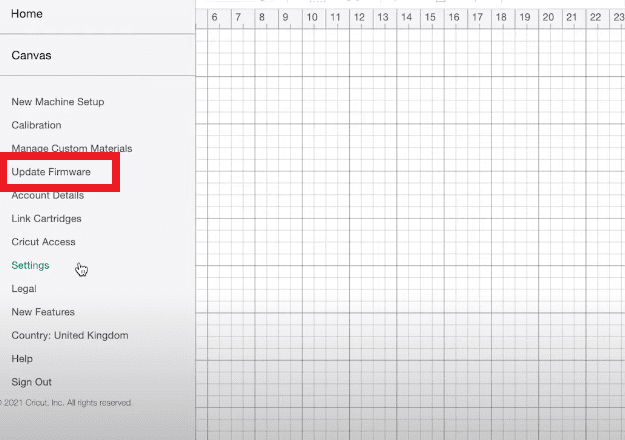
Check your Cricut Design Space app for any available firmware updates. Follow these steps to check for updates on Design Space:
- Click on the menu on the left side of the Design Space app.
- Click on Update Firmware option.

- If there are any available updates for your firmware, it should be visible.
- Update your firmware.
If there are no available updates visible, force a firmware update on your Cricut machine. Follow these steps to do a hard reset or force update your firmware:
- Turn off your Cricut machine and then turn it on again.
- Press and hold the Power button and the Load button together until the Power Button flashes a red light.
- Go to the Design Space app and then click on Update Firmware to force an update.
- You have done a hard reset on your Cricut machine. Try calibrating now to see if you get better results.
