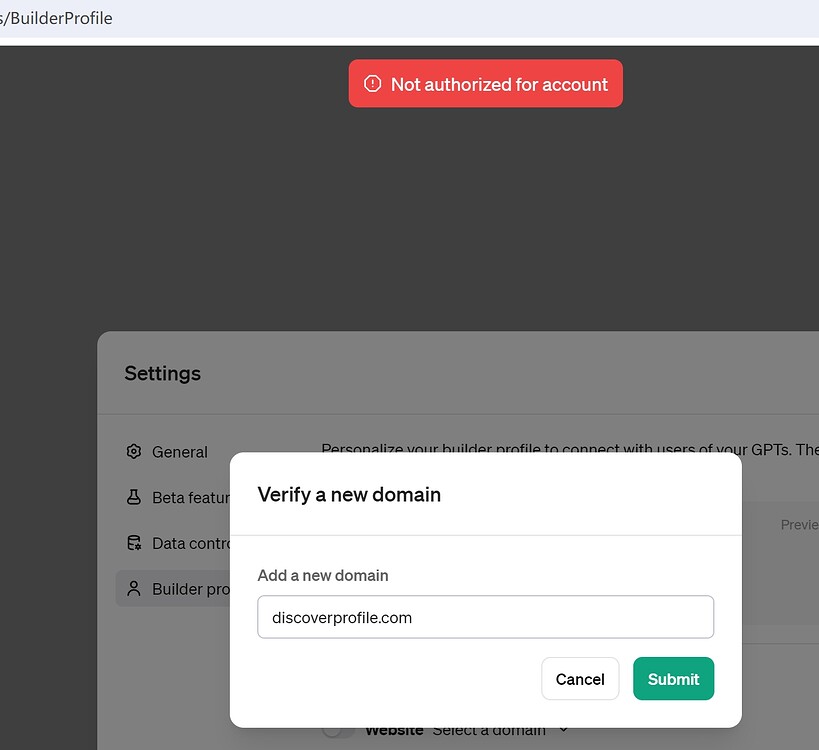
Are you struggling with the “Not authorized for account” error while attempting to verify your domain on ChatGPT? This roadblock can be frustrating but fear not!
In this blog, we’ll focus solely on providing effective solutions to help you overcome this issue swiftly.
How To Fix “Not Authorized For Account” On ChatGPT When Trying To Verify Domain?

To fix “not authorized for account” on ChatGPT when trying to verify domain, you can check account permissions, use the correct Domain format, and update DNS settings properly. Additionally, you can check your internet connection, and try a different browser.
1. Check Account Permissions In ChatGPT
The “Not authorized for account” error may arise if you don’t have the necessary permissions within your ChatGPT account or team settings.
Ensuring you have the correct permissions is crucial, as it allows you to make changes such as verifying domains.
By confirming your user role and permissions, you can rectify this issue and proceed with domain verification.
- Log in to your ChatGPT account.
- Navigate to the settings or team management area.
- Verify that your account role has administrative privileges or the required permissions to manage domains.
- If you’re not an admin, request the necessary permissions from the account holder or team administrator.
- Once you have the correct permissions, attempt to verify your domain again.
2. Use Correct Domain Format
Entering the domain in an incorrect format can trigger the “Not authorized for account” error.
Providing the domain in the correct format is essential because ChatGPT’s domain verification process is sensitive to the format and may not recognize an improperly entered domain.
- Go to the domain verification section in your ChatGPT account settings.
- Enter your domain name without “www” or any subdomains (e.g., “example.com” instead of “www.example.com”).
- Ensure there are no typos or extra spaces in the domain name.
- Submit the domain for verification and check if the error is resolved.
3. Update DNS Settings Properly
Incorrect DNS settings can prevent domain verification and lead to the “Not authorized for account” error.
Properly updating your DNS settings is necessary because it confirms the ownership of the domain to ChatGPT, which is a vital step in the verification process.
- Access your domain’s DNS settings through your domain registrar’s control panel.
- Add the TXT record provided by ChatGPT to your DNS settings.
- Ensure the record is entered correctly without any mistakes.
- Save the changes and wait for the DNS to propagate, which can take up to 48 hours.
- After propagation, try verifying the domain again in your ChatGPT account.
4. Check Your Internet Connection
A stable internet connection is essential for any online verification process.
Checking your internet connection is a fundamental step because if your connection is unstable or too slow, it might interrupt the domain verification process.
- Test your internet connection speed to ensure its stable and fast enough for web services.
- If the connection is unstable, perform a power cycle on your router and modem, which can resolve many connectivity issues:
- Unplug your modem and router from the power source.
- Wait at least 30 seconds before plugging the modem back in.
- After another 60 seconds, plug in the router.
- Wait for all lights to stabilize on both devices.
- If using Wi-Fi, try switching to a wired connection for more stability, then attempt the domain verification process again.
5. Try A Different Browser
Browser-specific issues can sometimes cause unexpected errors.
Trying a different browser can help because it rules out any browser extensions, compatibility issues, or settings that may interfere with the domain verification process.
Open a different web browser that you haven’t been using to attempt the domain verification.
6. Clear Your Browser Cookies And Cache
Stored cookies and cache can sometimes cause issues with web services.
Clearing your browser cookies and cache is beneficial because it removes any saved data that might conflict with the domain verification process.
For Google Chrome:
- Open Chrome and click on the three-dot icon at the top right corner.
- Hover over “More tools,” then click on “Clear browsing data.”
- In the dialog that appears, choose the time range for which you want to clear the data (you can select “All time” to clear everything).
- Check the boxes next to “Cookies and other site data” and “Cached images and files.”
- Click “Clear data” to complete the process.
For Mozilla Firefox:
- Click the menu button (three horizontal lines) in the top right corner of Firefox.
- Select “Options” and go to “Privacy & Security.”
- Under the “Cookies and Site Data” section, click the “Clear Data…” button.
- Check the options for “Cookies and Site Data” and “Cached Web Content.”
- Click “Clear” to remove these items.
For Safari:
- Open Safari and go to the “Safari” menu in the upper left corner of the screen.
- Choose “Preferences” and then click on the “Privacy” tab.
- Click on “Manage Website Data” and then “Remove All” to clear cookies.
- To clear the cache, you will need to enable the Develop menu by going to “Safari” > “Preferences” > “Advanced” and checking the box at the bottom that says, “Show Develop menu in menu bar.”
- Once the Develop menu is available, click on it and then select “Empty Caches.”
7. Allow Access To The Blocked Domain
The error could be due to your network blocking access to the domain required for verification.
Allowing access to the blocked domain is necessary because it ensures that your network’s security settings do not prevent communication with ChatGPT servers.
- Check any firewalls or network security settings that may be blocking the domain.
- Add the ChatGPT domain to the whitelist to allow traffic to and from this domain.
- Retest the domain verification process after making these changes.
8. Try Alternative Authentication Methods
Sometimes, the issue may be with the primary authentication method you’re using.
Trying alternative authentication methods can be a solution because it might bypass the hiccup that’s causing the “Not authorized for account” error.
- If you’re using a single sign-on (SSO) service, try logging in directly with your ChatGPT account credentials instead.
- Alternatively, if you’re logging in with your account credentials, try using any SSO options available.
- Ensure that any two-factor authentication (2FA) methods are set up correctly and working as expected.
9. Contact ChatGPT Support

If you’ve tried the above solutions and still face the “Not authorized for account” error, reaching out for support is the next step.
Contacting support can provide a resolution because they can investigate account-specific issues that may not be apparent to the user.
- Visit the ChatGPT support page.
- Create a support ticket, detailing the issue and the steps you’ve already taken to resolve it.
- Provide any relevant screenshots or information that could assist the support team.
- Wait for a response from ChatGPT support with further instructions or solutions.

