Are you tired of the default wallpapers on your MacBook and longing to personalize your device with your own picture?
Changing the wallpaper on your MacBook to your own image is a great way to add a personal touch and refresh the look of your device.
Whether you have a MacBook Air, MacBook Pro, or any other model, customizing the wallpaper can bring a sense of individuality to your device.
In this blog, we will explore the simple steps to change the wallpaper on your MacBook to your own picture and infuse your MacBook with a touch of your personality.
How To Change Wallpaper On MacBook To Your Own Picture?

Changing the wallpaper on your MacBook to a picture of your own is a simple process that can greatly personalize your computing experience. Here’s an actionable step-by-step guide to help you through the process:
Step 1: On your Mac, click the Apple menu at the top-left corner of the screen, then click “System Settings.” You may need to scroll down to find the Wallpaper option in the sidebar.
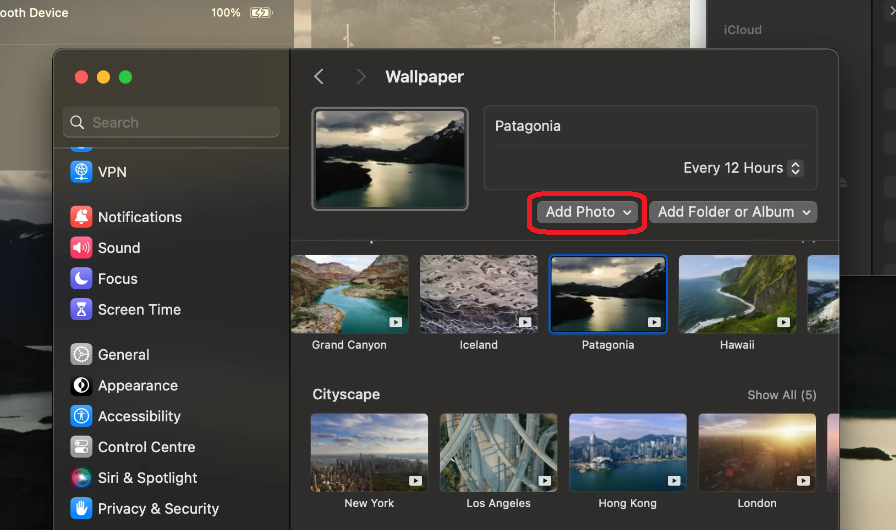
Step 2: In the System Settings window, select “Wallpaper” from the sidebar to access the wallpaper customization options.
Step 3: To use your own photo as a wallpaper, click on the “Add Photo” control. This will allow you to browse and select your personal image from your MacBook’s storage.
Step 4: Once you’ve selected your image, you can position it according to your preference. You can drag the image to align it, or use the available options to fill, fit, or stretch the image on your MacBook.
Step 5: Set Your Wallpaper After positioning your image, simply close the System Settings window. The image you’ve chosen will now be set as your desktop wallpaper.
Step 6: Alternatively, you can quickly set a photo from the Photos app as your wallpaper, open the Photos app, select the photo, click the Share button in the Photos toolbar, then choose “Set Wallpaper.”
Step 7: Use an Image from the Web If you want to use a picture from the web, control-click the image in your browser window, then select “Use Image as Desktop Picture.”
