Are you a Mortal Kombat enthusiast ready to conquer Invasion Mode, but find yourself stuck at the “Unable to Equip Relics” roadblock?
This glitch can be a real combo-breaker, halting your progress and dampening your fighting spirit.
But there’s no need to throw in the towel just yet!
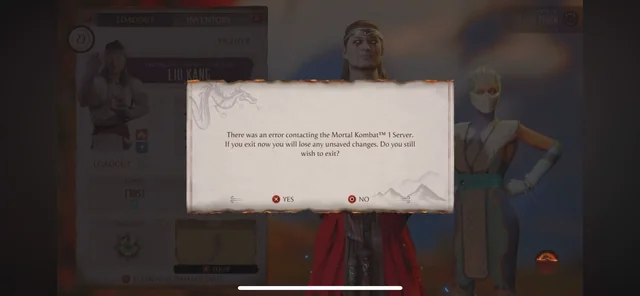
The error message reads as “There was an error in contacting the Mortal Kombat 1 Server. If you exit now you will lose any unsaved changes. Do you still wish to exit?”
In this blog, we’re going to tackle this issue head-on, providing you with a flawless strategy to fix the relic equipment problem so you can return to the fray fully armed.
How To Fix Unable To Equip Relics In Invasion Mode On Mortal Kombat 1?

To fix unable to equip relics in invasion mode on Mortal Kombat 1 you can toggle stat allocation to manual, equip relic directly, and exit and re-enter fighter select screen. Additionally, you can take a break from equipping relics, use the war horn talisman, and equip healing talisman with charges.
1. Toggle Stat Allocation To Manual
The “unable to equip Relics in Invasion Mode” bug in Mortal Kombat 1 can prevent players from utilizing the benefits relics provide, hindering their progress in Invasion Mode.
By toggling the allocation of stat points from automatic to manual, you can potentially bypass this glitch, allowing you to equip the desired relic and enjoy the mode as intended.
- Go to the character customization screen.
- Navigate to the allocate stat points section.
- Change the setting from automatic to manual allocation.
- Try equipping a relic again.
- Exit the screen and check if the relic remains equipped.
2. Equip Relic Directly
Directly equipping the relic to the character might bypass any interface bugs or glitches that are preventing you from doing so.
- Equip the relic to the character through the character customization options.
- Confirm the selection and check if the relic is displayed as equipped.
3. Exit The Re-enter Fighter Select Screen
Exiting certain screens in the game can sometimes trigger a refresh of the game’s state, potentially resolving minor glitches.
- Exit the fighter select screen after attempting to equip the relic.
- Re-enter the screen to see if the relic remains equipped.
4. Take A Break From Equipping Relics
Taking a break from attempting to equip relics can be a simple yet sometimes effective way to deal with a temporary glitch or bug.
- Stop trying to equip relics for a short period.
- Re-attempt to equip the relic after some time has passed.
5. Use War Horn Talisman
Using specific items like talismans can sometimes have unexpected effects on game mechanics, possibly resolving issues indirectly.
- Use the War Horn talisman in the game.
- Check if this action allows you to equip relics afterward.
6. Equip Healing Talisman With Charges
Equipping different types of talismans or items with specific properties, such as a healing talisman with charges, might influence the game’s mechanics and resolve issues.
- Equip a healing talisman that has charges.
- Try equipping relics again while the talisman is active.
7. Check Server Connectivity

Server issues can often lead to problems with game features, such as equipping relics.
Ensuring that you have a stable connection to the Mortal Kombat servers can resolve this issue, as it may be a result of server-side problems affecting your ability to equip relics.
- Confirm that your internet connection is stable.
- Restart your router to refresh your connection.
- Check the Mortal Kombat server status to ensure there are no ongoing outages.
- Try to equip the relic again once the server connection is confirmed stable.
8. Restart Mortal Kombat 1 And Clear Cache
Sometimes, temporary files and cache data can interfere with game functions.
Restarting the game can clear these temporary files, and if done correctly, this can resolve the issue, allowing relics to be equipped in Invasion Mode.
- Completely exit Mortal Kombat 1.
- If on console, power cycle the console by turning it off and unplugging it for a few minutes.
- If on PC, clear the cache from your system.
- Relaunch Mortal Kombat 1 and attempt to equip a relic in Invasion Mode.
9. Update Mortal Kombat 1 To Latest Version
Running an outdated version of Mortal Kombat 1 might lead to compatibility issues, such as problems with equipping relics.
Updating the game ensures that all known bugs and glitches, including the relic equipment issue, are addressed.
An updated game provides a smoother, more stable experience.
- Navigate to the game on your platform’s respective store or library.
- Check for any available updates for Mortal Kombat 1.
- Download and install the update if available.
- Once updated, launch the game and try to equip the relic again.
10. Uninstall And Reinstall Mortal Kombat 1
If all else fails, there might be a deeper issue within the game files.
Uninstalling and reinstalling Mortal Kombat 1 can give you a fresh start, removing any corrupted data that could be causing the relic equipment issue.
This is often a last resort, but it can be effective in resolving persistent problems.
- Uninstall Mortal Kombat 1 from your system.
- Perform a system restart to ensure all temporary files are cleared.
- Reinstall Mortal Kombat 1 from the original source.
- Launch the game and check if you can now equip relics in Invasion Mode.
11. Contact Mortal Kombat 1 Customer Support

If the issue persists after trying all the above solutions, the problem might be more complex and require intervention from the game’s support team.
Customer support can provide more in-depth troubleshooting or inform you of any known issues and potential patches.
- Reach out to the Mortal Kombat 1 customer support team through their official channels.
- Provide them with details of the issue, what you have tried, and any error messages you’ve received.
- Follow any additional steps they provide to resolve the issue.

