Are you a Rocket League enthusiast who’s encountered the frustrating Error Code 0 while trying to play the game?
Don’t worry, you’re not alone.
Many players have faced this issue, but the good news is that there are several effective solutions available.
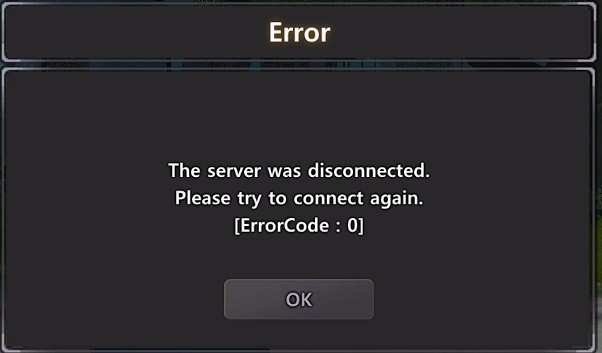
The error message read as “The server was disconnected. Please try to connect again. [Error Code : 0]”
In this article, we’ll explore the most reliable methods to fix Rocket League Error Code 0 and get you back to enjoying the game hassle-free.
How To Fix Rocket League Error Code 0?

To fix rocket league error code 0 you can update Rocket League, check server status, verify date and time settings. Additionally, you can change DNS settings, ensure “automatically adjust for daylight saving” is checked, check the NAT type, delete the savedata folder, disable firewall, restart modem and router, and uninstall and reinstall Rocket League.
1. Update Rocket League
Ensure that you have the latest version of Rocket League installed. If an update is available, download and install it to replace any corrupted files with new ones.
Follow these steps to update Rocket League:
- Launch the Rocket League game client.
- Check for available updates by clicking on the “Settings” option.
- If an update is available, follow the on-screen instructions to download and install it.
- Once the update is complete, restart the Rocket League game client.
2. Check Server Status

Before troubleshooting further, it’s essential to check the current server status of Rocket League. Sometimes, server issues can cause Error Code 0. You can check the server status on the official Rocket League website or social media channels.
3. Verify Date And Time Settings
Make sure that the date and time settings on your gaming platform are accurate. If they are incorrect, it can lead to connectivity issues with the game servers. For PC users, syncing the Windows clock can resolve connectivity problems with Epic Online Services.
Here are the steps to verify date and time:
- Access the system settings menu on your gaming platform.
- Locate the “Date and Time” or “Clock” settings.
- Ensure that the date and time are set accurately.
- If necessary, manually adjust the date and time settings.
- Restart your gaming platform for the changes to take effect.
4. Change DNS Settings
Consider changing the DNS settings on your gaming platform. This can be done by accessing the network settings and entering custom DNS server addresses.
Many players have reported success in resolving connectivity issues, including Error Code 0, by using specific DNS servers.
Follow these steps to change DNS settings:
- Access the network settings menu on your gaming platform.
- Locate the “DNS settings” option.
- Set the DNS server addresses to the following:
Primary DNS: 8.8.8.8
Secondary DNS: 8.8.4.4
- Save the changes and restart your gaming platform.
5. Ensure “Automatically Adjust For Daylight Saving” Is Checked
In the Xbox settings, ensure that “Automatically adjust for daylight saving” is checked.
This can help maintain accurate time settings, which is crucial for seamless connectivity and gameplay experience. To do this,
- Access the Settings app on your Xbox.
- Select “System.”
- Choose “Time.”
- Check the box next to “Automatically adjust for daylight saving time.”
- If the box is already checked, uncheck it, check it again, and then restart your Xbox.
6. Check The NAT Type (For Xbox Only)
Check the Network Address Translation (NAT) type on your Xbox.
A strict or moderate NAT type can lead to connectivity issues, including Error Code 0.
To check the NAT Type:
- Access the Settings app on your Xbox.
- Select “Network.”
- Choose “Test NAT Type.”
- If your NAT type is strict or moderate, consider opening ports on your router to improve connectivity.
7. Delete The SaveData Folder (For PC Only)
For PC users, deleting the SaveData folder can help resolve Error Code 0 specific to the PC platform.
This process can assist in replacing any corrupted game files that might be causing the error, ultimately restoring seamless gameplay experience.
Follow these steps to delete the SaveData Folder:
- Exit the Rocket League game if it is running.
- Navigate to the following directory on your PC: C:\Users<username>\AppData\Local\RocketLeague
- Delete the “SaveData” folder.
- Relaunch the Rocket League game client.
8. Disable Firewall (For PC Only)
Temporarily disable your firewall and antivirus software to check if they are causing the connectivity issue.
Sometimes, these security measures can block the game from accessing the necessary online services.
Here are the steps to disable firewall:
- Access the Windows Firewall settings on your PC.
- Temporarily disable the Windows Firewall.
- Attempt to launch the Rocket League game client.
- If the game launches successfully, enable the Windows Firewall after closing the game.
- If the game still fails to launch, disable any antivirus software you may have installed and try again.
9. Restart Modem And Router
Perform a power cycle by unplugging your modem and router, waiting for about 10 seconds, and then plugging them back in. This process can resolve connectivity issues by ensuring a fresh connection to the internet. To do this,
- Unplug your modem and router from their power sources.
- Wait for about 10 seconds.
- Plug your modem back in and wait for it to fully boot up.
- Once the modem is connected, plug your router back in and wait for it to fully boot up.
- Attempt to launch the Rocket League game client.
10. Uninstall And Reinstall Rocket League
If the above methods do not work, consider reinstalling Rocket League. This can help replace any corrupted game files that might be causing the error.
Follow these steps to uninstall Rocket League from your console:
For PlayStation 4:
- On the PlayStation 4 home screen, select Settings.
- Scroll down and select System Storage Management.
- Select Applications.
- Scroll down and highlight Rocket League.
- Press the Options button on the controller.
- Select Delete.
- Select Delete again to confirm.
For Xbox One:
- On the Xbox One home screen, select My games & apps.
- Select See all.
- Scroll down and highlight Rocket League.
- Press the Menu button on the controller.
- Select Manage app.
- Select Uninstall.
- Select Uninstall again to confirm.
For Nintendo Switch:
- On the Nintendo Switch home screen, select System Settings.
- Select Data Management.
- Select Manage Software.
- Select Rocket League.
- Press the + button on the right Joy-Con.
- Select Delete Software.
- Select Delete again to confirm.
For PC:
- From the Start menu, search for Add or remove programs.
- Select Apps & features.
- Scroll down to find Rocket League in the list of installed games.
- Click on Uninstall next to Rocket League.
- Follow the prompts to uninstall the game.
Follow these steps to reinstall Rocket League from your console:
For PlayStation 4:
- On the PlayStation 4 home screen, select Library.
- Select Downloaded.
- Scroll down and select Rocket League.
- Press the Download button.
- Wait for the download to complete.
- Once the download is complete, select Launch.
For Xbox One:
- On the Xbox One home screen, select Store.
- Select Full catalog.
- Select Games.
- Search for Rocket League.
- Select Rocket League.
- Select Install.
- Wait for the download to complete.
- Once the download is complete, select Launch.
For Nintendo Switch:
- On the Nintendo Switch home screen, select the Nintendo eShop icon.
- Use the search bar to find Rocket League.
- Select the Rocket League game icon.
- Select Download.
- Wait for the download to complete.
- Once the download is complete, select the Rocket League icon on the Nintendo Switch home screen to launch the game.
For PC:
- Download and install the Epic Games Launcher if you haven’t already.
- Open the Epic Games Launcher and sign in to your account.
- Click on the Library tab.
- Search for Rocket League in the search bar.
- Click on the Install button next to Rocket League.
- Select the installation location and click on Install.
- Wait for the installation to complete.
- Once the installation is complete, you can launch Rocket League from the Epic Games Launcher.
11. Contact Rocket League Customer Support

If none of the above solutions resolve the issue, reaching out to Rocket League’s customer support for further assistance and guidance is recommended.
They will provide you with troubleshooting steps and can help you to solve this issue.

