Are you experiencing issues with G-Sync not working in the popular game Enshrouded? You’re not alone.
Many gamers have encountered this frustrating problem, but the good news is that solutions are available.
In this guide, we’ll explore the common causes of G-Sync not working in Enshrouded and provide step-by-step instructions to help you resolve the issue.

How To Fix Enshrouded G-sync Not Working?
If your Enshrouded G-sync is not working, then you can check V-Sync settings, update graphic drivers, and disable full-screen optimization. Moreover, you may also enable G-Sync in the control panel, and restart your PC.
Below is a detailed explanation of all the above-mentioned fixes:
1. Check V-Sync Settings
You should ensure that the V-Sync settings are properly configured to potentially resolve issues with G-Sync not working.
To fix G-Sync not working by checking V-Sync settings, you can follow these steps:
- Open NVIDIA Control Panel:
- Right-click on your desktop and select “NVIDIA Control Panel.”
- Manage 3D Settings:
- Click on “Manage 3D Settings” in the left-hand menu.
- Enable V-Sync:
- Under the “Manage 3D Settings” tab, ensure that “Vertical sync” is set to “On” or “Adaptive” to enable V-Sync.
- Per-Application Settings:
- If needed, you can also change V-Sync settings on a per-application basis by clicking “Program Settings” after selecting “Manage 3D Settings“
2. Update Graphics Drivers
Ensure that your graphics drivers are up to date as outdated drivers can cause G-Sync issues. You can download the latest drivers from the official website of your graphics card manufacturer.
To update your graphics drivers, follow these steps:
- Determine your graphics card:
- Open the NVIDIA Control Panel and click on “System Information” to find out the type of graphics card you have.
- Download the latest drivers:
- Visit the NVIDIA website and download the latest official drivers for your graphics card.
- Install the drivers:
- Run the downloaded driver installer and follow the on-screen instructions to complete the installation process.
- Restart your PC:
- After the installation, restart your PC to ensure the new drivers take effect.
- Check for updates:
- Open the NVIDIA Control Panel and navigate to the “Help” menu. Select “Updates” to check for any available updates.
By following these steps, you can ensure that your graphics drivers are up-to-date, which may help resolve issues with G-Sync not working.
3. Disable Full Screen Optimizations
Go to the game’s folder, click on the .exe file, go to properties, and turn off Full Screen Optimizations. This can sometimes interfere with G-Sync functionality.
To disable Full-Screen Optimizations, you can follow these steps:
- Navigate to the Application’s .exe File: Locate the .exe file of the application for which you want to disable Full-Screen Optimizations.
- Access Properties: Right-click on the .exe file and select “Properties” from the context menu.
- Open Compatibility Tab: In the Properties window, click on the “Compatibility” tab.
- Disable Full Screen Optimizations: Under the “Settings” section, check the box that says “Disable Fullscreen Optimizations.”
- Apply Changes: Click “Apply” and then “OK” to save the changes.
4. Enable G-Sync In The Control Panel
If G-Sync is not showing up in the NVIDIA Control Panel, you may need to install the monitor driver or toggle a setting to make the G-Sync option available.
To enable G-Sync in the NVIDIA Control Panel, follow these steps:
- Right-click on your Windows desktop.
- Click on “NVIDIA Control Panel.”
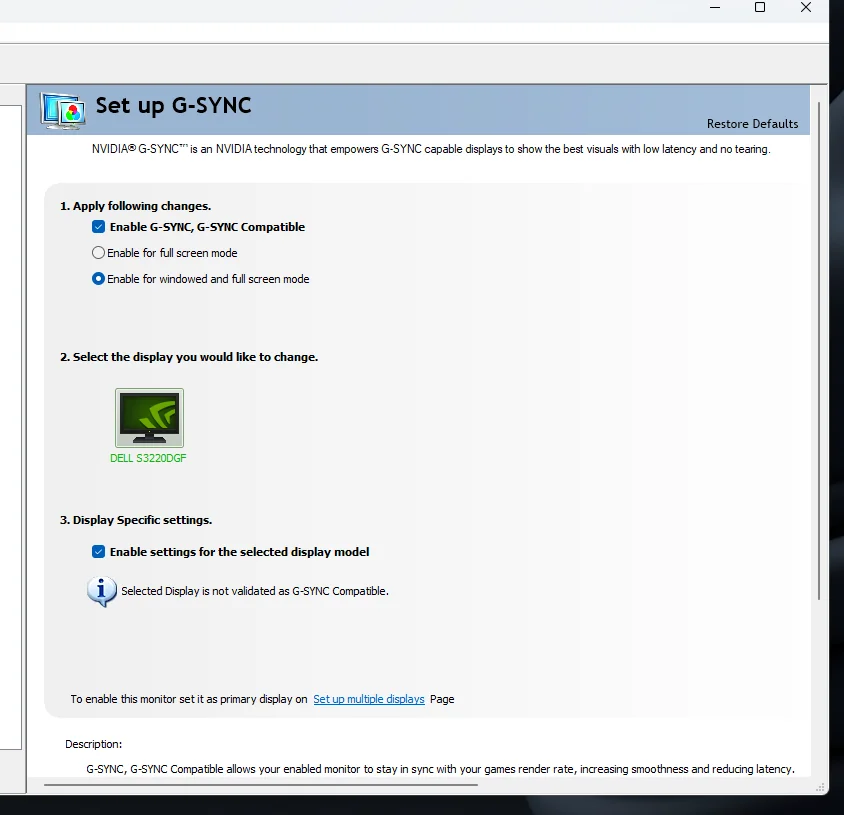
- In the left-hand menu, click on “Set up G-SYNC” under the “Display” section.
- If “Enable G-SYNC” is not checked, click the checkbox to enable it.
- Choose whether to enable it for full-screen or windowed modes.
- Ensure that you have a G-SYNC-compatible display connected, enabled, and configured as the primary display.
- Make sure the “Monitor Technology” is set to G-SYNC/G-SYNC Compatible from the “Manage 3D Settings” page.
By following these steps, you can enable G-Sync in the NVIDIA Control Panel, potentially resolving issues with G-Sync not working.
5. Restart Your PC
After making any changes, it’s important to restart your PC to ensure that the applied changes take effect.
To restart your PC, you can follow these steps:
- Using the Start Menu:
- Click on the “Start” button in the lower-left corner of your screen.
- Click on the “Power” icon.
- Select “Restart” from the options.
- Using Keyboard Shortcuts:
- Press and hold the “Ctrl,” “Alt,” and “Delete” keys at the same time.
- Click on the “Restart” option.
- Using the Power Button:
- Press and hold the power button on your computer until it shuts down.
- Press the power button again to turn it back on.
- Using Command Prompt:
- Open the Command Prompt by typing “cmd” in the search bar.
- Type “shutdown /r” and press enter.
6. Contact Enshrouded Support

If the previous steps did not resolve the issue with G-Sync not working, you can try contacting Enshrouded support for further assistance.
They may be able to provide additional troubleshooting steps or offer a solution to the issue.

